Basketball is a game of speed, skill, and decision-making, and as a guard, your ability to get past defenders and score is crucial. One shot that has become essential for guards at all levels is the floater. This guide will walk you through why mastering the floater is important and how you can develop this skill. Along the way, we’ll get into drills and techniques to help you perfect this move.
Key Terms:
- Floater: A high-arching shot designed to go over taller defenders, typically taken while on the move.
- Guard: A basketball position responsible for ball handling, passing, and often scoring.
- Offensive Footwork: The body movements players use to get into the right position for a shot.
Why the Floater Is Important for Guards
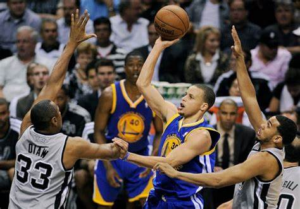
Being a guard means frequently driving into the paint where taller, stronger defenders play. The floater allows you to shoot over these players without getting blocked. It’s a quicker, more efficient alternative to stopping for a jump shot or attempting a layup that might get contested. Players like Stephen Curry, Trae Young, and Tony Parker have perfected this shot, making it a valuable tool in their game.
The Mechanics of a Good Floater
To master the floater, there are four essential steps:
- Approach – Start with controlled dribbling as you move toward the basket. Your approach should be smooth and balanced, allowing you to get into the floater’s shooting motion quickly.
- Footwork – Good footwork is key. Typically, the floater is taken off one foot, but depending on your momentum, it can also be off two feet. Either way, make sure you’re balanced before going up.
- Release – The key to a successful floater is the high, soft release. As you jump, use a gentle wrist flick to create a high arc, which helps avoid defenders trying to block your shot. Make sure your hand stays underneath the ball during the release for better control.
- Touch – Floaters aren’t about power; they’re about touch. Aim to have the ball drop softly through the hoop. Developing this touch takes practice, so be patient and consistent.
Drills to Improve Your Floater
Mastering the floater takes time, but if you practice these drills, you will improve jurastically:
- One-Foot Floater Drill:
Start from the three-point line, dribble into the paint, and practice releasing your floater off one foot. Alternate between your left and right hand. - Two-Foot Floater Drill:
Similar to the one-foot drill but focus on taking the floater off two feet. This can help when you’re coming to a quick stop and need to keep control. - Cone Drill for Floater:
Set up cones to simulate defenders in the paint. As you approach each cone, perform a floater over it. This drill simulates game situations where you need to make quick decisions. - Floater and Finish Drill:
Combine floaters with finishing techniques. Dribble toward the hoop, perform a floater, and if you miss, immediately go for the rebound and finish the play with a layup or another floater. - Spot Shooting with a Floater:
Place markers around the paint and practice floaters from different spots. Changing your location builds confidence in shooting floaters.
Below is a video that can help visually walk you through steps and drills to perfect the floater:
https://youtu.be/eJe2OnDrtmc?si=3ry3_SAQKDJRYSDG
When and Where to Use the Floater
Knowing when to use the floater is very important. Floaters are best utilized when you’re on the move and facing a tall defender who’s close to the rim. They’re also ideal when you’ve beaten your primary defender but are too far away for a layup.
Use the floater in these situations:
- Driving into traffic: When you find yourself surrounded by defenders but still want to get a shot off.
- In transition: A quick floater can catch the defense off guard.
- Off the pick-and-roll: If the defender switches leaving you space in the paint, a floater is a great way to score.
Common Mistakes to Avoid
Even the best players make mistakes when learning a new move. Here are some common errors that happen when practicing the floater:
- Forcing the floater when unnecessary: If you have space for a regular jump shot or layup, do not pass it up. The floater is a tool, not a catch-all solution.
- Rushing the shot: Although the floater is a quick shot, rushing it will often lead to a miss. Take your time to get the right shot off.
- Incorrect form: Make sure you’re keeping your body balanced and follow through on the shot. Bad form can lead to bad results.
FAQs on the Floater
Q: Should I use my off-hand for floaters?
A: Yes! Learning to use your non-dominant hand for floaters makes you more versatile and harder to guard. Practice floaters with both hands during drills.
Q: How can I get better at shooting floaters in games?
A: Practice. The more you incorporate floaters into your drills, the more comfortable you’ll be using them in real game situations.
Q: What’s the difference between a floater and a runner?
A: “Runner” usually refers to a floater shot while moving more horizontally along the court, while a “floater” often refers to a shot taken while moving more vertically toward the basket.
Mastering the floater can take your game to the next level, making you a more dangerous and stronger player. With the drills and techniques outlined here, you’ll be on your way to scoring with confidence and finesse in no time.
Want more basketball tips and tricks? Subscribe to Basketball Fundamentals for weekly updates and exclusive content!